How to Set Up a Garage Recycling Station
The garage is where most household recycling ends up anyway: overflowing bags of cans by the door, a stack of flattened boxes behind the car, and a curbside bin that is full two days before pickup. A dedicated garage recycling station turns that clutter into a simple routine. This guide walks through how to plan one, what to include, where to put it, and how a wall-mounted crusher helps you fit far more into the bins you already have.
Why the Garage Is the Right Place for Recycling
Kitchens are short on space, and recycling bins compete with trash cans, pet bowls, and everything else on the floor. The garage usually has open wall space, easy access to the curbside bins, and a floor that is easy to clean if a can drips. Moving the main sorting and crushing work to the garage keeps the kitchen tidy and puts your recyclables right next to the bin they will eventually go into.
A good station also saves trips. Instead of carrying a half-full bag outside every day, you collect containers in a small kitchen bin, then empty it into the garage station once or twice a week, where everything gets sorted, flattened, and stored until pickup or a redemption run.
Step 1: Check Your Local Rules First
Before you buy bins or drill holes, find out what your local program accepts. Rules differ between cities and haulers, so look at your city or waste hauler's website and note:
- Which materials go in curbside recycling (aluminum, steel cans, plastic types, glass, cardboard).
- Whether materials must be sorted or can be mixed (single-stream).
- Whether your program has any guidance on crushed or flattened containers.
- Whether you live in a bottle deposit state, where some containers should stay whole for a refund.
If you are in a deposit state, read our guide to bottle deposit states before you start crushing. It explains why redeemable containers usually need to stay uncrushed.
Step 2: Decide How Many Bins You Need
Your bin setup should mirror how you actually get rid of material. Most garages work well with three to four containers:
- Crushed cans and bottles. The bin that sits directly under your crusher. Flattened aluminum cans, 2-liter bottles, water bottles, and gallon jugs drop straight in.
- Deposit returns (if applicable). A bag or bin for redeemable containers that you keep whole.
- Cardboard and paper. A tall bin, a box, or simply a slot against the wall for broken-down boxes.
- Glass (if your program takes it). A sturdy bin of its own. Glass should never go in a can crusher.
If your program is single-stream, you may be able to combine the crushed bin and cardboard into one large container and use the station mainly for flattening and staging.
Step 3: Pick a Spot and Plan the Layout
Look for a section of wall about three to four feet wide near the door you use to take bins to the curb. Keep these points in mind:
- Studs or solid backing. A wall-mounted crusher takes a firm downward pull, so mount it into wall studs or solid wood. Our step-by-step installation guide covers this in detail.
- Height. Mount the crusher so the raised handle sits around chest-to-shoulder height. That lets you pull down with your body weight instead of only your arms.
- Clearance. Leave room for the handle to swing fully and for you to stand in front of it without bumping the car or shelves.
- Bin placement. Set the crushed bin directly below the crusher so flattened containers drop right in.
- Away from heat sources. Keep paper and cardboard away from water heaters, furnaces, and anything with a pilot light.
Step 4: Add the Crusher
A crusher is what turns a recycling corner into a real station. Uncrushed cans and bottles are mostly air, and they fill bins fast. Flattening them means fewer bags, fewer trips to the curb, and a bin that actually lasts until pickup day. For a closer look at the space side of things, see how to cut your household recycling volume.
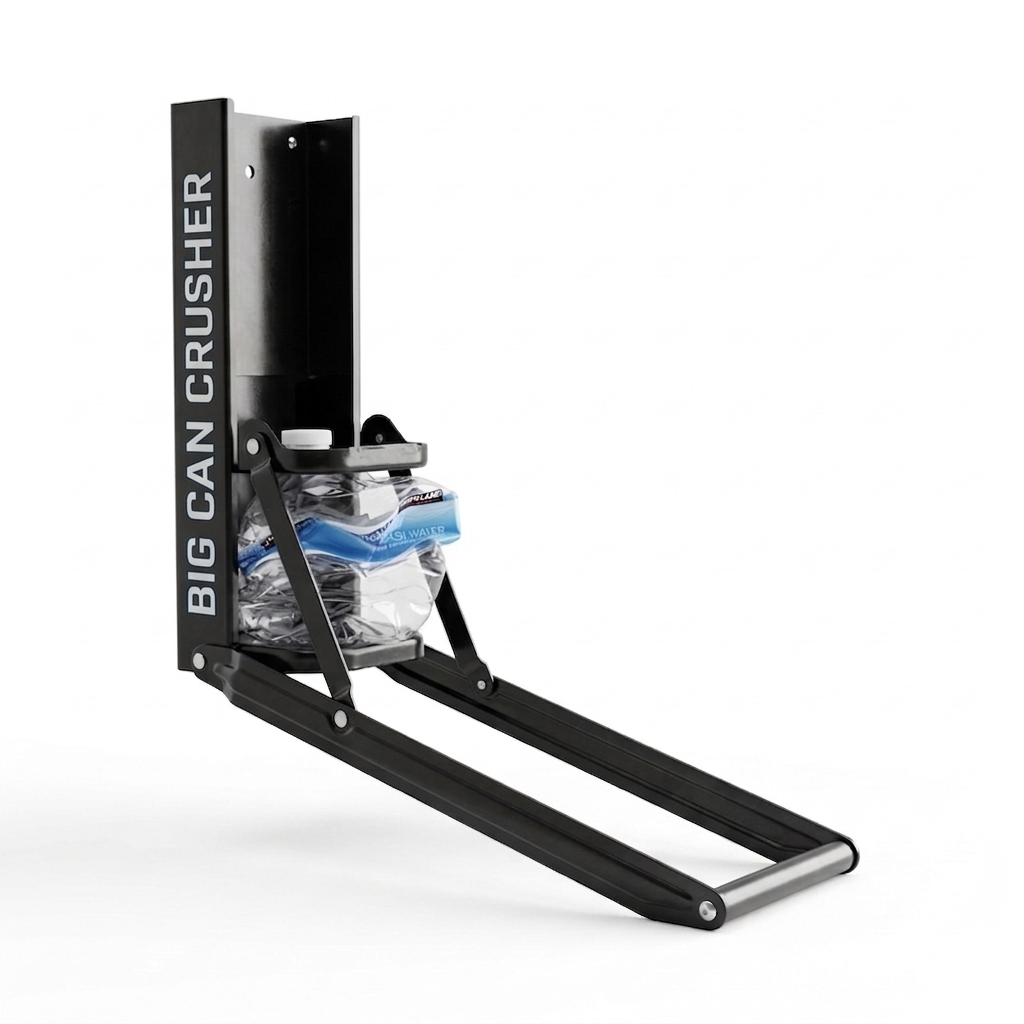
Many small crushers only fit 12 oz cans, which leaves the bulkiest containers, the 2-liter bottles and gallon jugs, untouched. BIG CAN CRUSHER is an all-metal, wall-mounted crusher with a chamber sized for 1-gallon jugs, so it crushes 12 oz aluminum cans, 16.9 oz water bottles, 2-liter bottles, and gallon milk and water jugs. Installation takes about 10 minutes, and all mounting hardware is included.
Step 5: Build a Simple Routine
The best station is one that takes almost no thought to use. A routine that works for many households:
- Rinse in the kitchen. Give cans and bottles a quick rinse and drain them so the garage stays clean and does not attract insects.
- Remove caps. Always take caps off plastic bottles and jugs. Uncapped bottles crush flatter and stay flat, and capped ones push back against the handle.
- Carry the kitchen bin out once or twice a week. Sort deposit containers into their own bag first.
- Crush in one session. Pull each container through the crusher and let it drop into the bin below. A batch of cans and jugs takes just a few minutes.
- Empty into the curbside bin on pickup day. Flattened containers pack tightly, so the bin goes further.
Useful Extras
- A small shelf or hook above the station for a box cutter (for breaking down cardboard), work gloves, and a roll of bags.
- Labels on each bin so everyone in the house knows what goes where.
- A printed list of local rules taped to the wall, especially if your program has unusual exclusions.
- Floor mat or tray under the bins to catch drips from cans that were not fully drained.
Safety Notes
Do not put glass, aerosol cans, or containers with liquid inside into a can crusher. Keep children's hands away from the crushing area while the handle is in use. Check that the mounting screws and pivot bolt stay snug after the first few weeks, and tighten them if needed.
Practical Takeaway
A garage recycling station needs only a few things: a clear section of wall, bins that match your local rules, and a crusher mounted at a comfortable height with a bin right below it. Sort deposit containers first, crush everything else, and you will make fewer trips to the curb and stop fighting an overflowing bin.
FAQ
How much space does a garage recycling station need?
A section of wall about three to four feet wide is usually enough for a wall-mounted crusher and two or three bins underneath and beside it. Leave room to stand in front of the crusher and swing the handle fully.
Should I crush cans before putting them in curbside recycling?
It depends on your local program. Many accept flattened containers, but check your hauler's guidance. Our article Should You Crush Cans Before Recycling? goes through the pros and cons.
Can I crush plastic bottles and milk jugs in the same crusher as cans?
With BIG CAN CRUSHER, yes. The chamber is sized for 1-gallon jugs, so it handles 12 oz cans, 16.9 oz water bottles, 2-liter bottles, and gallon jugs. Remove caps first for the flattest result.
What height should I mount a wall can crusher?
Mount it so the top of the raised handle is around chest-to-shoulder height. That lets you use your body weight to pull down, which makes crushing larger bottles and jugs much easier.
Where can I find more answers about BIG CAN CRUSHER?
See the product page and our FAQ page for installation, capacity, and guarantee details.
Crush gallon jugs, 2-liter bottles & cans in one pull
See the BIG CAN CRUSHER